Physical DOM
November 30th, 2006
This tutorial will show you how to use open source hardware and software to change the appearance of your web site in real time using a physical sensor.
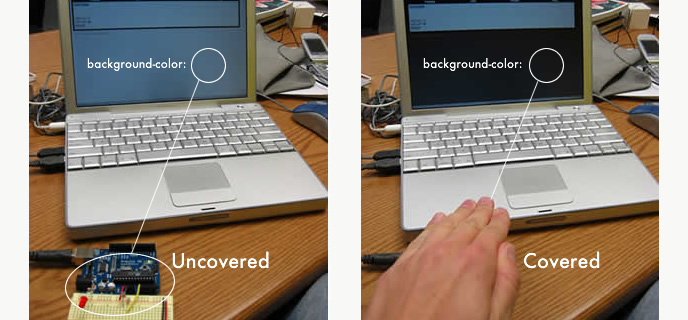
Specifically, we will change the background color of a web page based on the reading from a photoresistor. This tutorial uses the Arduino Microcontroller, Processing, MySQL, PHP and some basic electrical components.
Media:
Tutorial
Getting Started
Downloads
This tutorial was written November 30, 2006 and revised August 31, 2007.

There are 4 main components in this system: the hardware, the software (Processing), the database, and the web scripting. First, I’ll describe what each of these components does and how to configure them. Then we’ll string them all together.
1) Hardware: sensor + microcontroller

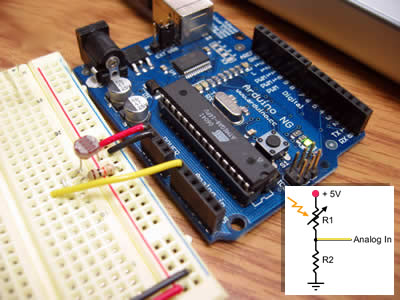
The circuit is a simple voltage divider using a photoresistor and a standard resistor. The center of the voltage divider is the input to the microcontroller. Try to choose the value of resistor R2 such that it matches the maximum resistance of the photoresistor (R1). This will give you maximum dynamic range. I used a 10k Ohm resistor. On the Arduino I have connected the center of the voltage divider to Analog-in pin 0 and used the power bus for 5V and ground.
Arduino Code
The Arduino code, physical_DOM_arduino.pde, is pretty straightforward. The main loop of the program reads the analog value of the sensor, translates that into a byte value, 0 to 255, and then writes that value to the serial port. Using a range of 0 to 255 makes it convenient to send a single byte for each reading and maps nicely to HTML code for color values. You will need to burn this code to your board using the Arduino IDE.
2) Software: Processing
The Processing code, physical_DOM_processing.pde, plays a very important part in this system by connecting the physical world to the data world, the borderland between atoms and bits. Processing receives the sensor reading that the Arduino sends out of its serial port and then sends the reading to a MySQL database. In between receiving from the Arduino and sending to the database a little math may be done to adjust the responsiveness and dynamic range of the sensor.
3) Database: MySQL
In order for the webpage to access the latest sensing data, we will store the data in a MySQL database. The MySQL command for creating the appropriate table is written below. Also, you will want to make sure that the username/password combo in your Processing & PHP code has permission in MySQL to write to this table.
CREATE TABLE ’color’ (
’color_id’ int(11) NOT NULL auto_increment,
’color’ varchar(6) default NULL,
PRIMARY KEY  (’color_id’)
) TYPE=MyISAM AUTO_INCREMENT=1 ;
4) Web Scripting: HTML, PHP + AJAX
The HTML, physical_DOM.html, is very simple. The only things worth noting are the inclusion of the JavaScript file in the document HEAD and the inclusion of an onload() function call in the BODY tag. You don’t need to edit this file.
The automatic page refreshment is accomplished through the use of AJAX. The Javascript file, update_DOM.js, calls a PHP file, update_DOM.php, which queries the database and returns the most current intensity value of the sensor that has been stored in the database by Processing. The JavaScript then uses the string returned by the PHP script to update the background color of the webpage by manipulating the DOM. You will need to update the PHP file with your server settings for the MySQL database. The JavaScript file does not need to be changed. Once updated with your MySQL settings, upload these three files to the same directory on your web server.
Operating the System
In order to get this system going you’ll need to have the code physical_DOM_arduino.pde burned to your Arduino board and have it connected to your computer. Next, open up processing and run the physical_DOM_processing.pde code. That’s it! Open up your browser and navigate to the HTML page on your web site. The background color on your webpage should be updating automatically based on your dynamic interaction with the photoresistor!
Troubleshooting
If your page is not updating as expected, try pointing your browser at the URL for your PHP script. You can manually refresh this page to see if your values are changing. If they are not changing here, try directly looking at your MySQL table by using something like PHPmyAdmin or CocoaMySQL. Also, don’t forget about the display consoles in Arduino and Processing.
Conclusion: Taking it further
The background color is just one of many features that can be manipulating using AJAX and the DOM, not to mention the myriad of sensors to be used. Using a variety of sensors you could make a chameleon, amorphous site. What fun!
